

How to Configure a Linux VPS Firewall with IPTables
Introduction
Securing your Linux VPS with a firewall is an important step to protect it from unauthorized access and attacks. IPTables is the built-in Linux firewall solution that allows you to filter incoming and outgoing traffic. This article will walk you through step-by-step how to configure an IPTables firewall on your Linux VPS.
In this article, we will show you how to configure a Linux VPS firewall using IPTables. IPTables is a powerful firewall utility that is included with most Linux distributions. It can be used to create a variety of firewall rules, including rules that allow or deny traffic based on source and destination IP addresses, port numbers, and protocols.
Requirements
A Linux VPS from B2BHOSTINGCLUB
Administrative access (root/sudo) to your server via SSH
Understanding IPTables
Before configuring IPTables rules, it’s important to understand some basics about how it works. IPTables manages the tables in the Linux kernel that contain the firewall rules. There are three main tables:
INPUT – Rules that apply to inbound traffic destined for the VPS itself.
OUTPUT – Rules that apply to outbound traffic leaving from the VPS.
FORWARD – Rules that apply to traffic that is routed through the VPS but not destined for it.
Within each table, there are built-in chains that contain the actual rules:
PREROUTING – Rules that apply before the routing process.
INPUT – Rules for inbound traffic.
FORWARD – Rules for forwarded traffic.
OUTPUT – Rules for outbound traffic.
POSTROUTING – Rules that apply after the routing process.
Each rule contains three main parts:
A chain – Which table and chain the rule applies to.
A filter – Whether to ACCEPT, DROP or REJECT the packets.
Match criteria – Which packets the rule applies to based on things like protocols, ports, source/destination IPs, etc.
Configuring a Linux VPS Firewall with IPTables
On most Linux distributions, IPTables comes pre-installed. However, we’ll first ensure it’s installed and enabled. We can install IPTables using:
sudo apt install iptables  # For Debian/Ubuntu
sudo yum install iptables  # For CentOS/Red Hat
Then we can enable the IPTables service to start on boot with:
sudo systemctl enable iptables
And start the service now with:
sudo systemctl start iptables
Before adding our own rules, we’ll flush any existing rules that may be present with:
sudo iptables -F
This will flush all rules from all chains to ensure we have a clean slate.
Next, we’ll add rules to allow traffic to and from localhost (our VPS itself). This is needed for applications to communicate internally. We’ll add these rules:
sudo iptables -A INPUT -i lo -j ACCEPT
sudo iptables -A OUTPUT -o lo -j ACCEPT
This will accept all input and output traffic on the lo interface (localhost).
We’ll add rules to drop any INVALID packets that may be used in DoS attacks or fingerprinting. These packets are very unlikely to be legitimate.
sudo iptables -A INPUT -m conntrack --ctstate INVALID -j DROP
sudo iptables -A FORWARD -m conntrack --ctstate INVALID -j DROP
sudo iptables -A OUTPUT -m conntrack --ctstate INVALID -j DROP
Now we’ll allow incoming connections that are in response to existing outbound connections from our VPS.
This is needed for things like allowing HTTP responses for outgoing HTTP requests.
sudo iptables -A INPUT -m conntrack --ctstate RELATED,ESTABLISHED -j ACCEPT
sudo iptables -A FORWARD -m conntrack --ctstate RELATED,ESTABLISHED -j ACCEPT
Now by default, we’ll drop all other inbound traffic not covered by our rules so far:
sudo iptables -P INPUT DROP
This will deny all other input traffic until we specifically allow it.
Next, we’ll allow incoming connections to specific ports that we want to expose to the internet.
For example, if we want to allow inbound HTTP, HTTPs and SSH, we’ll add:
sudo iptables -A INPUT -p tcp --dport 80 -j ACCEPT
sudo iptables -A INPUT -p tcp --dport 443 -j ACCEPT
sudo iptables -A INPUT -p tcp --dport 22 -j ACCEPT
You’ll want to replace these with the ports that your applications require.
It’s a good idea to log any packets that get dropped by our rules. We can do this with:
sudo iptables -A INPUT -j LOG --log-prefix "INPUT dropped: " --log-level info
sudo iptables -A FORWARD -j LOG --log-prefix "FORWARD dropped: " --log-level info
sudo iptables -A OUTPUT -j LOG --log-prefix "OUTPUT dropped: " --log-level info
This will log information about dropped packets to /var/log/syslog or /var/log/messages.
We want to allow all outbound traffic by default, so we specify the default policy for the OUTPUT chain:
sudo iptables -P OUTPUT ACCEPT
Use the following command to accept traffic from a specific IP address.
# sudo iptables -A INPUT -s your_IP_address_to_authorise -j ACCEPT
$ sudo iptables -A INPUT -s 192.168.1.0/24 -j ACCEPT
Replace the IP address in the command with the IP address you want to authorise. You can also block traffic from an IP address:
# sudo iptables -A INPUT -s your_IP_address_to_block -j DROP
sudo iptables -A INPUT -s 192.168.1.0/24 -j DROP
Replace the IP address in the command with the IP address you want to block. You can reject traffic from an IP address range with the following command:
# sudo iptables -A INPUT -m iprange --src-range your_start_IP_address-your_end_IP_address -j REJECT
sudo iptables -A INPUT -m iprange --src-range 192.168.122.2-192.168.122.34 -j REJECT
sudo iptables -A INPUT -m iprange --dest-range 8.8.8.2-8.8.8.22 -j DROP
The iptables options we used in the examples work as follows:
-m: Matches the specified option.
-iprange: Instructs the system to wait for a range of IP addresses instead of one.
–src-range: Identifies the source IP address range.
–dest-range: Identifies the destination IP address range.
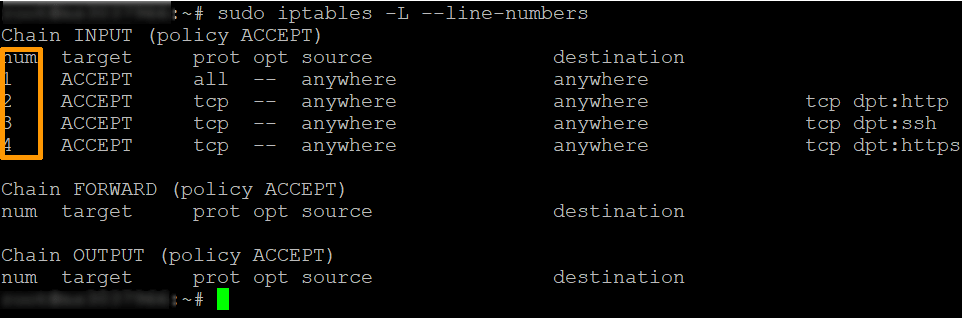
A more precise method is to delete the line number of a rule. First, list all rules by entering the following:
sudo iptables -L --line-numbers
Locate the line for the firewall rule you want to remove and run this command:
sudo iptables -D INPUT Number
Replace Number with the rule line number you want to delete.
You can now test your firewall rules by using the iptables command to list the rules. To do this, run the following command:
sudo iptables -L
This will list all of the firewall rules that are currently in effect.
When the system is restarted, iptables does not keep the rules you created. Whenever you configure iptables on Linux, any changes you make apply only until the next reboot. So we save our IPTables rules so they persist across reboots. We can save the rules to directory /etc/iptables/ with:
# Ubuntu
sudo iptables-save > /etc/iptables/rules.v4
sudo ip6tables-save > /etc/iptables/rules.v6

# CentOS
sudo iptables-save > /etc/sysconfig/iptables
sudo ip6tables-save > /etc/sysconfig/ip6tables
Then we can load these rules on boot with:
# Ubuntu
sudo sh -c "iptables-restore < /etc/iptables/rules.v4"
sudo sh -c "ip6tables-restore < /etc/iptables/rules.v6"
Another method, to save rules to Ubuntu-based systems, type:
sudo -s iptables-save -c
The next time your system boots, iptables will automatically reload the firewall rules.
Conclusion
You should now have a functioning Linux VPS firewall with IPTables that allows necessary traffic while blocking unwanted connections. Be sure to update your rules as your system and network requirements change. Hope this step-by-step guide helps you configure and secure your Linux VPS with IPTables! Let me know if you have any other questions.
![Introduction What is the Use of UFW in Ubuntu Linux? The UFW (Uncomplicated Firewall) is a frontend for iptables and is particularly well-suited for host-based firewalls. UFW provides a framework for managing netfilter, as well as a command-line interface for manipulating the firewall. UFW is a great firewall tool that is designed to be run on hosts or servers. It allows or blocks incoming and outgoing connections to and from the server. You can block ports, IPs or even entire subnets using UFW. It is not as flexible as iptables but is vastly easier for basic operations. UFW vs IPTables When it comes to configuring firewall on Ubuntu server, you have two primary options: ufw and iptables. Both tools provide firewall functionality but differ in terms of ease of use and complexity. UFW is a front-end for iptables that aims to simplify the process of configuring a firewall. It provides a user-friendly command-line interface and allows you to manage firewall rules using human-readable syntax. UfW provides a set of default rules that are easy to understand and configure. IPTables provides granular control over network traffic by allowing you to define rules based on various criteria such as IP addresses, ports, protocols, and more. IPTables gives you more flexibility, but it's also slightly more complicated to configure. So use whichever one you're most happy with. If you use iptables, remember that it only affects IPv4 - you need to also use ip6tables if your server has IPv6. In this article, we will show you how to install and config the UFW firewall on Ubuntu 22.04. How to Install UFW Firewall To install UFW on Ubuntu, follow these 3 steps. Step 1: SSH into the Linux system To install UFW, you need to SSH into the system. Step 2: Update system check settings $ sudo apt update $ sudo apt upgrade To check if ufw is installed, you can use the which command: $ which ufw And if the result doesn’t show output, it means ufw is not installed and you should install it like below. Step 3: Install UFW $ sudo apt-get install ufw After your ufw installation is complete, use the command below to check. The initial default after installation, UFW will be disabled because it has not been activated and you have to enable it manually. $ sudo ufw status verbose ----------------------------- Output Status: inactive Step 4: Enable UFW, Activate UFW After Installation To enable UFW and start enforcing the firewall rules, run: $ sudo ufw enable To temporarily disable UFW, run: $ sudo ufw disable How to Config UFW Firewall Use ufw to manage firewall rules, add/delete/restore/reset ufw rules. 1. UFW Check Status To check the current status of UFW, run the following command: $ sudo ufw status This will show you if UFW is active or inactive, the default input and output policies, and any rules that have been created. A fresh Ubuntu 22.04 installation will have UFW inactive by default. 2. UFW Allow Port To allow incoming connections on a specific port, you need to allow that port using UFW. For example, to allow HTTP traffic on port 80, run: $ sudo ufw allow 80/tcp This will allow all incoming TCP connections on port 80. You can also specify the IP address to allow only for a specific host: $ sudo ufw allow from 192.168.1.100 to any port 80 To allow both TCP and UDP protocols on port 123, run: $ sudo ufw allow 123/tcp $ sudo ufw allow 123/udp 3. UFW Allow Multiple Ports To allow multiple ports at once, specify the starting and ending ports: $ sudo ufw allow 2000:2100/tcp This will allow all ports from 2000 to 2100. You can also specify ports in a comma-separated list: $ sudo ufw allow 80,443,8080/tcp $ sudo ufw allow 22,25,110/tcp 4. UFW Allow HTTP/HTTPS Traffic It is a common requirement to allow incoming HTTP and HTTPS traffic. You can do that with: $ sudo ufw allow 'Apache Full' This will allow HTTP traffic on port 80 and HTTPS traffic on port 443. 5. UFW Allow SSH To allow incoming SSH connections on port 22, run: $ sudo ufw allow 22/tcp This is required to manage your Ubuntu server remotely using SSH. 6. UFW Allow DNS Traffic DNS uses UDP protocol on port 53. To allow incoming DNS queries, run: $ sudo ufw allow 53/udp 7. UFW Allow VNC To allow incoming VNC connections (usually port 5900 ), run: $ sudo ufw allow 5900/tcp 8. UFW Deny Port To block specific ports or protocols, use deny instead of allow. For example, to block incoming SMTP traffic: $ sudo ufw deny 25/tcp Closing tcp and udp ports, replace 80 with the desired port number: $ sudo ufw deny 80 For a port range you use the syntax: $ ufw deny 1234:2345 $ ufw deny 1234:2345/tcp $ ufw deny 1234:2345/udp 9. UFW Set Default Policies By default, the UFW incoming policy is set to deny, which means all incoming traffic is blocked. You can change this policy using: $ sudo ufw default deny incoming # To deny all incoming traffic $ sudo ufw default allow incoming # To allow all incoming traffic Similarly, you can set the default outgoing policy using: $ sudo ufw default deny outgoing $ sudo ufw default allow outgoing It is recommended to keep the default incoming policy as deny for security. 10. UFW Checking Logs You can enable logging with the command: $ sudo ufw logging on Log levels can be set by running sudo ufw logging low|medium|high, selecting either low, medium, or high from the list. The default setting is low. UFW keeps logs of denied connections in /var/log/ufw.log. You can view the log file using: $ sudo less /var/log/ufw.log To enable verbose logging, run: $ sudo ufw logging verbose Then UFW will log all allowed and denied connections. 11. UFW Delete Rules The syntax is as follows to list all of the current rules in a numbered list format: $ sudo ufw status numbered Status: active To Action From -- ------ ---- [ 1] 22/tcp ALLOW IN Anywhere [ 2] 80/tcp ALLOW IN Anywhere # accept Apache [ 3] 443/tcp ALLOW IN Anywhere # accept HTTPS connections [ 4] 1194/udp ALLOW IN Anywhere # OpenVPN server [ 5] 3000:4000/tcp ALLOW IN Anywhere [ 6] 3000:4000/udp ALLOW IN Anywhere To delete 6th rule type the command: $ sudo ufw delete 6 You can also delete rules for a specific port: $ sudo ufw delete allow 80 To flush all UFW rules and restore the default policy, run: $ sudo ufw reset 12. UFW Restore to default For some reason, you need to restore/delete all existing rules to return to the original defaults, use the reset option to do the following: $ sudo ufw disable $ sudo ufw reset $ sudo ufw enable This will: - Disable UFW - Flush existing rules - Re-enable UFW with the default configuration This ensures UFW works with the default settings again. 13. UFW Enable IPv6 Make sure the directive IPV6=yes do exists in /etc/default/ufw file. For instance: $ cat /etc/default/ufw Conclusion UFW is a powerful tool that can greatly improve the security of your servers when properly configured. This reference guide covers some common UFW rules that are often used to configure a firewall on Ubuntu. Your firewall is now configured to allow (at least) SSH connections. Be sure to allow any other incoming connections that your server needs, while limiting any unnecessary connections, so your server will be functional and secure. I hope this helps you configure and manage UFW firewall on Ubuntu 22.04. Let me know if you have any other questions!](https://b2bhostingclub.com/blog/wp-content/uploads/2026/01/How-To-Install-and-Config-UFW-Firewall-on-Ubuntu-22.04-150x150.png "How to Configure a Linux VPS Firewall with IPTables")
